Ubuntu Linux Support
Velocity Micro's award winning Customer Care, the premier source for information on your Velocity Micro PC. To help answer your questions and address support issues, our team of experts have compiled this library of walk-throughs, downloads, and FAQs. This information is updated, expanded, and refined on a daily basis to ensure you have the very latest information available.
Skip to
Fixing Common Audio Issues in Ubuntu
Having trouble getting sound to work on your Ubuntu Linux PC? Here are some common audio issues and how to fix them.
1. Check Your Settings
The most common culprit for audio problems is simply incorrect settings. Here's how to check:
- Open Settings: Click on the system menu (usually represented by dots or your avatar in the top right corner) and select "Settings."
- Go to Sound: Look for the "Sound" section in Settings. It might be under "Hardware" or directly listed depending on your Ubuntu version.
- Verify Output Device: Make sure the correct output device (speakers, headphones, etc.) is selected.
- Adjust Volume: Ensure the volume is not muted and set to an appropriate level on both the system slider and the individual application volume control.
2. Restart Audio Services
Sometimes, a simple restart of the audio services can resolve temporary glitches. Here's how:
- Open Terminal: Press Ctrl+Alt+T to open the terminal window.
- Restart PulseAudio: Run the following command:
- Restart ALSA (Optional): If PulseAudio doesn't fix it, try restarting ALSA:
sudo systemctl --user restart pulseaudio
sudo alsa force-reload
3. Check for Missing Drivers
In rare cases, missing audio drivers might be the issue. Here's how to check:
- Open Terminal: As mentioned before, press Ctrl+Alt+T to open the terminal.
- Identify Hardware: Run the following command to list your sound card:
lspci | grep -i audio
4. Reinstall Audio Packages
If the issue persists, reinstalling the audio packages might help. Here's how:
- Open Terminal: Again, press Ctrl+Alt+T to open the terminal.
- Update Package Lists: Ensure your package lists are up-to-date:
- Reinstall Packages: Reinstall the audio packages using:
sudo apt update
sudo apt reinstall pulseaudio alsa-base alsa-utils
5. Additional Resources
If none of the above solutions work, you might need to consult additional resources specific to your hardware or Ubuntu version. Here are some helpful links:
- Ubuntu Sound Troubleshooting Procedure: https://help.ubuntu.com/stable/ubuntu-help/sound-nosound.html.en
- Ask Ubuntu Forum: https://askubuntu.com/questions
- Running the commands mentioned above might require administrator privileges (using sudo).
- Always be cautious when running commands in the terminal and double-check what you're typing.
Troubleshooting Black Screen or Login Issues in Ubuntu 22.04
Are you facing a black screen or encountering problems logging in to your Ubuntu 22.04 system? Don't fret! This guide will help you troubleshoot these common issues and get you back to your desktop.
Understanding the Problem:
A black screen or login loop can have various causes. Here are some common culprits:
- Graphics Driver Issues: Updated or incompatible graphics drivers might prevent the system from properly rendering the login screen.
- Configuration File Issues: Corrupted or incompatible configuration files in your home directory can cause login problems.
- Display Manager Issues: The display manager responsible for showing the login screen might malfunction.
Troubleshooting Steps:
We'll approach this systematically, starting with the simplest solutions and gradually moving towards more complex troubleshooting methods.
1. Try a Forced Restart:
Sometimes, a simple restart can resolve temporary glitches. Press and hold the power button for a few seconds to force a restart. After rebooting, attempt to log in again.
2. Accessing tty (Text Terminal): If the graphical login screen isn't working, you can try logging in through a text terminal. Here's how:
- During boot, hold down Ctrl + Alt + F3 (or another function key depending on your system). This will switch you to a text terminal (tty).
- Login using your username and password in the text-based interface.
3. Booting with nomodeset (Graphics Driver Issues):
If you manage to log in via tty, the issue might be related to graphics drivers. Here's how to address it:
- Reboot: Restart your system.
- Access GRUB Menu: Hold down Shift during boot to access the GRUB menu (the boot loader).
- Edit Boot Option: Select the Ubuntu boot option you want to use (usually the latest kernel version). Press e to edit the selected entry.
- Add nomodeset: In the edit window, find the line that starts with linux /boot/vmlinuz.... Add nomodeset at the end of the line, after quiet splash. Press Ctrl + X or F10to boot with these modifications.
- Test and Fix: If you can now log in graphically with nomodeset, it confirms a graphics driver issue. Update your graphics drivers using the Software Updater tool or the terminal while in this mode. Once updated, reboot normally (without nomodeset) to check if the issue is resolved.
4. Reinstall LightDM (Display Manager Issues):
If the problem persists, reinstalling the display manager (LightDM in Ubuntu) might help. Here's how (using the tty):
- Update Package Lists: Run the following command:
- Reinstall LightDM: Run this command to reinstall the display manager:
- Reboot: Restart your system using:
sudo apt update
sudo apt reinstall lightdm
sudo reboot
5. Additional Resources:
If none of these solutions work, you might need to consult more specific resources. Here are some helpful links:
- Ask Ubuntu Forum: https://discourse.ubuntu.com/t/ask-ubuntu/21
Remember:
- Running the commands mentioned above might require administrator privileges (using sudo).
- Be cautious when running commands in the terminal and double-check what you're typing.
How to Force Close Frozen Apps in Ubuntu
An unresponsive application can be frustrating, especially when it prevents you from using your computer effectively. Thankfully, Ubuntu offers several ways to force close frozen apps and regain control of your system.
Here are three methods you can try, starting with the simplest:
1. Using the Window Manager
- Click the application icon on the launcher bar (usually on the left side of the screen) to try minimizing or restoring the window.
- Right-click on the application icon and select "Close" from the menu. If the application is truly frozen, this won't work.
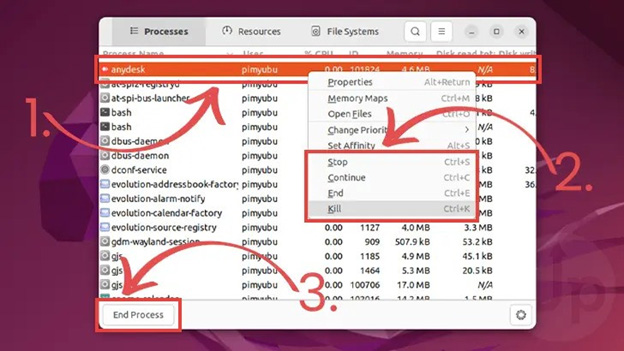
2. Using System Monitor (GUI)
System Monitor is a graphical tool that provides an overview of running processes on your system. You can use it to identify and terminate unresponsive applications.
- Open System Monitor:
-> Click on "Activities" (or press the Super key) and search for "System Monitor."
-> Alternatively, press Ctrl + Alt + T to open the terminal and run the command gnome-system-monitor (or system monitor depending on your desktop environment). - Identify the Frozen App: Look for the process associated with the frozen application. You can sort by CPU, memory usage, or process name to locate it more easily.
- End the Process: Right-click on the process name and select "End Process" from the context menu or left click and select “End Process” at the bottom of the window, depending on your distro.
- Confirmation: A confirmation window might appear asking to "Force Quit" or "Wait." Choose "Force Quit" to terminate the application immediately.
- Open Terminal: Press Ctrl + Alt + T to open a terminal window.
- Identify Process ID (PID): You'll need the process ID (PID) of the frozen application to use the kill command. Here's how to find it:
-> In System Monitor, right-click on the process and select "Properties." The PID will be listed under the "General" tab.
-> Use the ps aux command in the terminal to display a list of running processes. The PID will be the first number in each line. - Terminate the Process:
-> Once you have the PID, run the following command in the terminal, replacing
with the actual process ID: kill-> Forceful Termination (Optional): If the application remains unresponsive, you can try a more forceful termination using the -9 option:kill -9 - If none of these methods work, you can try restarting your computer. This will terminate all running applications.
- Consider creating a keyboard shortcut for launching the System Monitor or the kill command for quicker access in the future.
3. Using the Kill Command (Terminal)
The kill command offers more granular control over terminating processes. Here's how to use it:
Important Note: Using kill -9 should be a last resort, as it can cause data loss in the application.
By following these methods, you should be able to effectively force close frozen applications in Ubuntu and regain control of your system.
Additional Tips:
Backing Up and Restoring Your Files in Ubuntu with Deja Dup
Ever worry about losing important files due to a hard drive crash, accidental deletion, or even a malware attack? Having a reliable backup strategy is crucial in today's digital world. Thankfully, Ubuntu offers a user-friendly tool called Deja Dup to help you easily back up your valuable data and restore it in case of need.
Deja Dup: Your Ubuntu Backup Buddy
Deja Dup is a pre-installed application on most Ubuntu desktops. It's a simple yet powerful tool that allows you to schedule automatic backups of your important files to various destinations, ensuring your data is safe and secure.
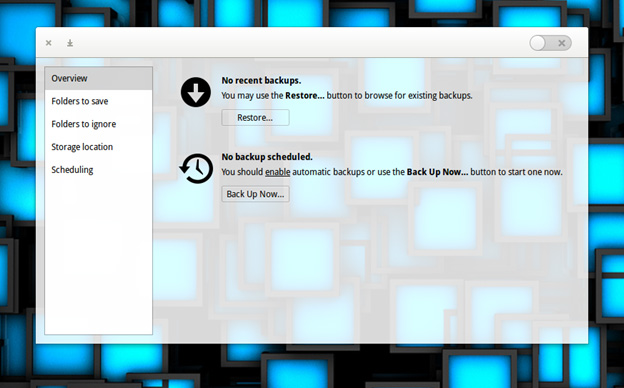
Setting Up Backups with Deja Dup
- Finding Deja Dup: Open the Activities overview (usually by clicking on the top left corner) and search for "Deja Dup." Alternatively, press Ctrl + Alt + T to open the terminal and run deja-dup. If not installed, Deja Dup can be found in the Ubuntu Software shop.
- Choosing Your Backup Location: Deja Dup allows you to back up to various locations, including:
-> Local Folders: This option lets you back up to another folder on your internal drive (not recommended for primary backups due to a single point of failure).
-> External Drives: Connect an external hard drive and select it as the backup location. This is a popular and convenient choice.
-> Network Storage: If you have a Network Attached Storage (NAS) device on your network, you can choose it as the destination for your backups. - Selecting Folders to Back Up: Deja Dup lets you choose specific folders to include in your backups. By default, it selects your home folder (containing Documents, Downloads, etc.). You can exclude folders you don't need to back up.
- Scheduling Backups: Deja Dup allows you to schedule automatic backups. You can choose daily, weekly, monthly, or even create custom schedules to fit your needs.
- Encryption (Optional): For an extra layer of security, Deja Dup lets you encrypt your backups with a password. This is highly recommended if your backups are stored on an external drive or a network location.
- Starting Your Backups: Once you've configured the settings, click "Back Up Now" to initiate your first backup. Deja Dup will compress your files and transfer them to the chosen destination.
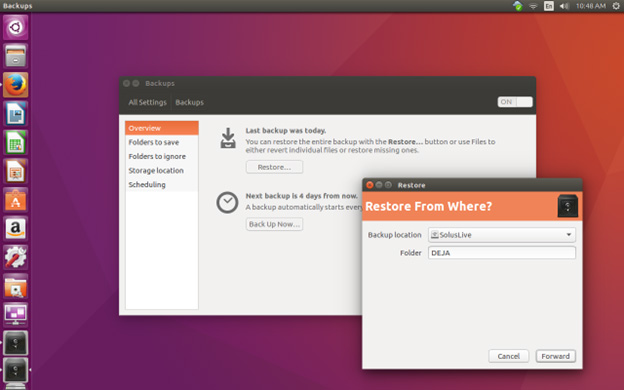
Restoring Your Files with Deja Dup
In case of data loss, Deja Dup makes it easy to restore your files.
- Open Deja Dup: Launch Deja Dup from the Activities overview or terminal as mentioned earlier.
- Choose Backup to Restore: If you have multiple backups, Deja Dup will list them. Select the relevant backup you want to restore from.
- Selecting Files/Folders: Deja Dup allows you to restore individual files, folders, or the entire backup. Browse the backup and choose what you need to restore.
- Choosing Restore Location: Specify where you want to restore the selected files. You can choose the original location or a new one.
- Initiate Restore: Click "Restore" to begin the process. Deja Dup will copy the selected files from the backup to the chosen location.
Additional Tips:
- Test Your Backups: Occasionally perform restore tests to ensure your backups are functional and accessible.
- The 3-2-1 Rule: Consider the 3-2-1 backup rule for added security: 3 copies of your data, on 2 different mediums (e.g., local and external drive), with 1 offsite copy (e.g., cloud backup).
- External Drive Health: Monitor the health of your external drive and consider replacing it periodically to prevent backup failures due to drive deterioration.
Fixing Common Package Manager Errors in Ubuntu
Package managers are the backbone of software management in Ubuntu. They handle installing, updating, and removing software packages. However, sometimes you might encounter errors while using the package manager, preventing you from installing or updating software. This guide will help you troubleshoot and fix common package manager errors in Ubuntu.
Understanding Package Manager Errors:
Package manager errors can manifest in various ways, often displaying cryptic error messages. Here are some common types of errors:
- Package dependency errors: These occur when a package requires another package (dependency) to function, and that dependency is missing or incompatible.
- Package corruption errors: Damaged package files can cause installation or update failures.
- Package conflicts: Sometimes, installing a package might conflict with another package already installed on your system.
- Repository related errors: Issues with package repositories (sources from where software is downloaded) can lead to errors.
Troubleshooting Steps:
Here's a systematic approach to tackle package manager errors:
1. Update Package Lists:
An outdated package list might not reflect the latest information about available packages. To update your package lists, run the following command in your terminal:
sudo apt update
2. Identify the Error Message:
Pay close attention to the specific error message displayed. It often provides clues about the nature of the problem.
3. Common Error Solutions:
Here are some solutions for common package manager errors:
- Dependency Errors: Try installing the missing dependencies explicitly. The error message might mention the missing package name. You can install it using:
sudo apt install
- Package Corruption Errors: Re-downloading the package files can resolve corruption issues. Try:
sudo apt --reinstall install
- Package Conflicts: If a conflict arises, you might need to remove the conflicting package or find an alternative. Research the conflict online or consult Ubuntu forums for specific solutions.
4. Refresh Package Cache:
Occasionally, the package cache might become corrupted. Refreshing it can help:
sudo apt clean
5. Check Repositories:
Ensure your package repositories are configured correctly. You can access Software & Updates from the Settings menu to check repository settings and sources.
6. Advanced Troubleshooting: If the above steps don't resolve the issue, you might need to consult more advanced solutions:
- Forcing Package Configuration: Use sudo dpkg --configure -a to attempt automatic configuration of broken packages.
- Reinstalling Broken Packages: In rare cases, reinstalling all broken packages might be necessary. Use sudo apt install -f with caution, as it might reinstall unnecessary packages.
7. Online Resources:
For specific error messages or complex issues, searching online resources like the Ubuntu Forums (https://discourse.ubuntu.com/) or specific error codes in search engines can provide more tailored solutions.
Troubleshooting Bluetooth Connectivity Issues in Ubuntu
Having trouble connecting your Bluetooth devices to your Ubuntu system? Don't worry, this guide will walk you through some common Bluetooth issues and how to fix them.
Understanding the Problem:
Bluetooth connectivity problems can manifest in various ways, such as:
- Inability to find or pair Bluetooth devices
- Audio playback issues with Bluetooth headphones
- Connection drops or instability
- Difficulty connecting specific devices
Troubleshooting Steps:
Here are some methods you can try to diagnose and resolve Bluetooth issues in Ubuntu:
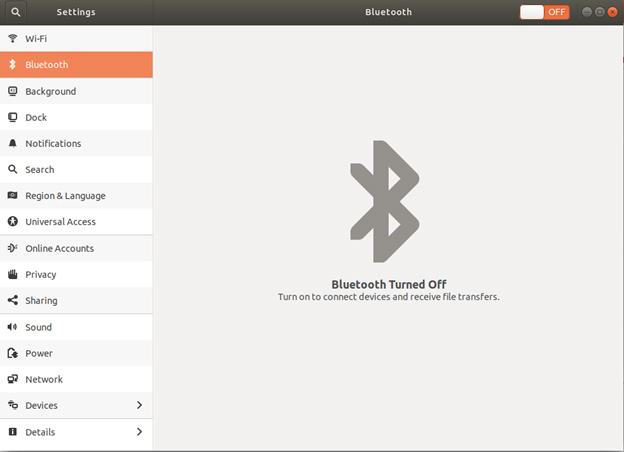
1. Check Bluetooth Status: Verify Enabled: First, ensure Bluetooth is enabled on your system. To do this:
- Open the Activities overview and start typing Bluetooth or navigate to Activities > Settings > Bluetooth.
- Click on Bluetooth to open the panel.
- Confirm the switch at the top is toggled on.
NOTE: If you’re working on a laptop, also make sure you confirm the Bluetooth keyboard hotkey is enabled as well. This varies due to model, but is generally tied to one of the Fn keys.
2. Restart Bluetooth Services:
Sometimes, a simple restart of the Bluetooth services can resolve temporary glitches. Open the terminal (press Ctrl + Alt + T) and run the following command:
sudo systemctl --user restart pulseaudio bluetooth
3. Ensure Device Visibility:
Make sure the Bluetooth device you want to connect to is discoverable or in pairing mode. This is usually done by pressing a button on the device itself. Refer to your device's manual for specific instructions.
4. Check for Missing Drivers:
In rare cases, missing Bluetooth drivers might be the culprit. Here's how to check:
- Open the terminal and run:
lspci | grep -i bluetooth - This will display information about your Bluetooth hardware. Use this information to search online for the appropriate driver for your sound card.
If the issue persists, reinstalling or updating the Bluetooth packages might help.
Open the terminal and run:
sudo apt update
sudo apt reinstall --reinstall bluetooth pulseaudio alsa-utils
sudo apt reinstall --reinstall bluetooth pulseaudio alsa-utils
6. Additional Resources:
-
If none of the above solutions work, you might need to consult additional resources specific to your hardware or Ubuntu version. Here are some helpful links:
- Ubuntu Sound Troubleshooting Procedure: https://help.ubuntu.com/stable/ubuntu-help/sound-nosound.html.en (While this focuses on sound, it also addresses Bluetooth audio)
- Ask Ubuntu Forum: https://ubuntu.com/community/contribute/documentation/discourse
Advanced Troubleshooting (Optional):
For experienced users, here are some additional steps you can try:
- Check for Conflicting Software or Signals: Certain software might interfere with Bluetooth. Consider temporarily disabling any programs that might be causing issues or sending conflicting signals.
- Edit Configuration Files (Not Recommended for Beginners): Modifying Bluetooth configuration files can be risky. Only attempt this if you're comfortable with editing system files and have researched the specific changes needed for your situation.
Troubleshooting Network Issues in Ubuntu
Here are some methods you can try to diagnose and resolve network issues in Ubuntu:
1. Check the Obvious:
- Physical Connections: Ensure your network cable is securely plugged into your computer's Ethernet port (if wired) or that you're connected to the correct Wi-Fi network (if wireless).
- Airplane Mode: Make sure Airplane Mode is disabled in your system settings (if applicable).
2. Verify Network Status: Network Manager Icon: Click on the system menu (usually represented by dots or your avatar in the top right corner) and check the network icon. It should indicate if you're connected and the signal strength (if Wi-Fi).
3. Restart Network Services:
Sometimes, a simple restart of the network services can resolve temporary glitches. Open the terminal (press Ctrl + Alt + T) and run the following command:
sudo systemctl restart networking
4. Check IP Address and DNS Settings:
- Command Line: Open the terminal and type ip addr show. This will display information about your network interfaces and IP address. You can also check your DNS servers using cat /etc/resolv.conf .
- Network Settings: You can access your network settings through the system menu (Settings > Network) to view and potentially modify IP address and DNS configurations (consult your network administrator or ISP for guidance if needed).
5. Identify Hardware Issues:
- Wired Connection: Try connecting a different device to the same network cable to see if the issue persists. This can help isolate whether it's a problem with your computer's network adapter or the cable itself.
- Wireless Connection: If possible, try connecting to a different Wi-Fi network to see if the issue is specific to your current network.
If none of the above solutions work, you might need to consult additional resources specific to your hardware or Ubuntu version. Here are some helpful links:
- Ubuntu Wireless network troubleshooter: https://help.ubuntu.com/community/WifiDocs/WirelessTroubleShootingGuide
- Ask Ubuntu Forum: https://discourse.ubuntu.com/
Advanced Troubleshooting (Optional):
For experienced users, here are some additional steps you can consider:
- Check for Software Updates: Outdated network drivers or system software might cause issues. Ensure you have the latest updates by running sudo apt update && sudo apt upgrade in the terminal.
- Edit Network Configuration Files (Not Recommended for Beginners): Modifying network configuration files can be risky. Only attempt this if you're comfortable with editing system files and have researched the specific changes needed for your situation.
By following these steps and consulting online resources when needed, you should be able to diagnose and fix most common network connectivity issues in Ubuntu. If you're still having trouble, consider seeking help from the Ubuntu community forums.
Adding Printers in Ubuntu
There are two main methods for adding printers in Ubuntu:
1. Using the Settings Menu:
This is the most convenient method for most users.
- Open Settings: Click on the system menu and select "Settings."
- Navigate to Printers: Locate the "Printers" section within Settings. This might vary slightly depending on your Ubuntu version.
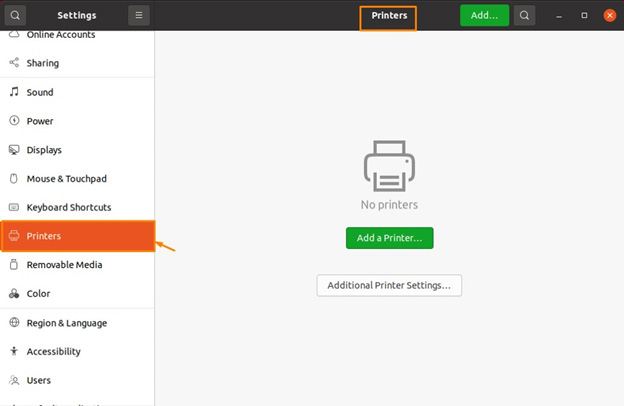
- Add Printer: Click the "Add" or "+" button to initiate the printer search.
- Discover Printers: Ubuntu will automatically search for available printers on your network.
- Select Printer: Choose the printer you want to add from the list. If your printer is connected directly to your computer via USB, ensure it's powered on and the USB cable is securely plugged in.
- Install Driver (if needed): Ubuntu might prompt you to install the necessary drivers for your printer. Follow the on-screen instructions to complete the driver installation.
- Set Default Printer (Optional): If you have multiple printers, you can choose a default printer for most printing tasks.
2. Using the Command Line (For Advanced Users):
This method offers more control but requires familiarity with terminal commands.
- Open Terminal: Press Ctrl + Alt + T to open the terminal window.
- Launch the Printer Setup Tool: Type the following command and press Enter:
system-config-printer - Follow On-Screen Instructions: The system-config-printer tool will guide you through the process of adding your printer, including selecting the device, installing drivers (if needed), and setting it as default.
Troubleshooting: If you encounter issues during the setup process, consult the documentation for your specific printer model or seek help on the Ubuntu forums (https://discourse.ubuntu.com/).
Wireless Network Troubleshooting
Is your Ubuntu system struggling to connect to the wireless network? This guide will walk you through some steps to diagnose and fix common Wi-Fi issues.
Initial Checks:
Before diving deep, let's rule out some simple causes:
- Double-check the switch: Make sure your Wi-Fi is enabled. Look for the Wi-Fi icon in your system tray and ensure it's turned on. Also, confirm Airplane Mode is disabled.
- Hardware Check – Most motherboards have onboard Wi-Fi, but not all. Make sure your hardware supports a wireless connection
- Wired vs. Wireless: Is your computer accidentally plugged into an ethernet cable? Disconnect any ethernet connections before proceeding.
- External adapter: If you're using a USB Wi-Fi adapter, verify it's securely plugged in.
Gathering Information:
To get a better understanding of the problem, let's gather some information:
- Network Manager Check: Open a terminal (Ctrl+Alt+T) and type nmcli device. This displays details about your network interfaces. Look for your wireless adapter and its connection status ("connected" means it's working).
Checking Hardware and Drivers:
- Hardware recognition: Still no sign of your wireless adapter? The command rfkill list in the terminal will show if a hardware switch is blocking your Wi-Fi. Look for "Hard blocked: no" to confirm it's enabled at the hardware level.
- Driver woes: Outdated or missing drivers can cause connection issues. The Ubuntu documentation [refer to Ubuntu wireless network troubleshooter] offers guidance on finding and installing the appropriate drivers for your wireless adapter.
Troubleshooting the Connection:
- Restarting services: Sometimes a simple restart of the networking service can resolve connectivity problems. In the terminal, type sudo service networking restart (enter your password when prompted).
- Forgetting the network: If you've connected to the network before but are facing issues now, try forgetting the network and re-connecting. You can usually do this through the Wi-Fi settings menu.
Advanced Troubleshooting:
If the above steps don't solve the issue, there might be a need for more advanced troubleshooting steps. Refer to the detailed guide on [Ubuntu wireless network troubleshooter] for advanced troubleshooting techniques like checking router settings, adjusting MTU (Maximum Transmission Unit), and disabling power-saving features for the wireless adapter.
Remember: If you have an external Wi-Fi adapter, the troubleshooting steps might differ slightly depending on the model. In such cases, consult the adapter's documentation for specific support.
System Freezing
System freezing is usually caused by faulty hardware, but can also result from software conflicts or other issues. Troubleshoot these issues using the following processes.
Check the memory using a utility called Memtest via the following instructions:
Using the GRUB Menu (Recommended):
- Restart your computer.
- Hold down the Shift key during boot to access the GRUB menu. This menu appears before Ubuntu fully loads.
- Look for an entry labeled "Memory test (memtest86+)". It might be listed alongside other boot options. Use the arrow keys to navigate.
- Select "Memory test (memtest86+)" and press Enter.
- Memtest will automatically start testing your system's memory. This process can take a while, depending on the amount of RAM you have.
Installing Memtest (Alternative):
If the GRUB menu doesn't have a memtest entry, you can install it for future use:
- Open a terminal window (Ctrl+Alt+T).
- Type the following command and press Enter:
sudo apt install memtest86+ - Enter your password when prompted.
Once installed, follow these steps to run memtest:
- Restart your computer.
- Hold down the Shift key during boot to access the GRUB menu.
- Now you should see the "Memory test (memtest86+)" option. Select it and press Enter to begin the test.
Running the Test:
- Memtest will start performing a series of memory tests. It's recommended to let it run for at least one complete pass.
- You can monitor the progress and any errors that are detected on the screen.
- To exit the test early, press the Esc key.
After the Test:
- If the test completes without errors, your RAM is likely functioning correctly.
- If errors are found, you'll need to diagnose the problem further. This might involve replacing faulty RAM modules.
Check for Hard Drive Errors
SATA Drives (SMART Test)
Run a SMART test on your SATA drives to pinpoint any potential errors using the following process:
- Open Disks application
- Select the hard drive on the left, then click the three-dot icon in the top right. Choose SMART Data and Self-Tests
- Click Start Self-test and choose the Extended test. This test takes a few hours to run but will give you lots of info about the health of the drive.
NVMe Drives
SMART test doesn’t work for NVMe drives, but you can use a package called nvme-cli instead. Install with this command:
sudo apt install nvme-cli
Next, get a list of NVMe's that are installed using:
sudo nvme list
Under 'Node' you will see a mount path for each drive installed. For example, if the path is '/dev/nvme0n2', to access the smart-log of that mount path, you would type in the following:
sudo nvme smart-log /dev/nvme0n2
Unexpected System Reboots in Linux
Unforeseen system reboots can disrupt your workflow and cause data loss. If your Ubuntu system keeps restarting unexpectedly, fret not! This guide will equip you with the knowledge to diagnose and potentially fix the culprit behind these spontaneous reboots.
Understanding the Cause:
Several factors can trigger sudden reboots in Ubuntu. Here are some common ones:
- Hardware Issues: Overheating components, faulty RAM, or a failing power supply can cause instability leading to reboots.
- Software Conflicts: Incompatibility between drivers, kernel versions, or newly installed applications might trigger crashes.
- System Overclocking: Pushing your hardware beyond its limits can lead to overheating and reboots.
- Power Supply Fluctuations: Unstable power delivery can cause sudden shutdowns.
- Kernel Panics
- Kernel or Desktop Process Crashes
- Application Memory Leaks
- Driver Errors
- Corrupted Operating System Files
Troubleshooting Steps:
Before diving in, it's helpful to gather information:
- Note the Circumstances: Does the reboot happen during specific tasks (gaming, heavy workloads) or randomly?
- Recent Changes: Did you install any new hardware, software, or update Ubuntu recently?
- Error Messages: Were there any error messages displayed before the reboot?
Let's Address the Potential Causes:
- Hardware Issues:
-> Temperature Check: Use built-in utilities like sensors in the terminal to monitor CPU and system temperatures. High temperatures can trigger reboots to prevent damage. Clean dust
buildup from vents and ensure proper airflow. ->RAM Test: Run a memory test using Memtest86+ (refer to our article on System Freezing for details). Faulty RAM can cause system instability.
-> Event Logs: Check system logs using sudo journalctl -b -1 in the terminal. Look for errors related to hardware components like CPU or thermal throttling.: - Software Conflicts:
-> Boot in Safe Mode: Booting in Safe Mode (recovery mode) loads only essential drivers and programs. If the reboot doesn't occur in Safe Mode, a software conflict might be the culprit. Try removing recently installed applications or updating them.
-> Kernel Version: Consider switching to a different kernel version (if available) to see if the issue persists. You can find instructions on managing kernels in Ubuntu documentation. - System Overclocking:
-> Reset BIOS Settings: If you've overclocked your system, revert the settings in your BIOS to factory defaults. Overclocking can lead to instability and reboots. - Power Supply Issues:
-> Test with a Different PSU: If possible, try using a different power supply to rule out power delivery problems. Voltage fluctuations can cause sudden shutdowns.
Advanced Troubleshooting:
If the above steps don't resolve the issue, consider seeking help from online forums or communities specific to Ubuntu. Provide details about your system configuration, recent changes, and any error messages you encountered. Here are some additional resources that might be helpful:
- Ubuntu Bug Reporting Tool: https://help.ubuntu.com/stable/ubuntu-help/report-ubuntu-bug.html.en
- Ask Ubuntu Forums: https://askubuntu.com/questions
Adding a Secondary Hard Drive to a Ubuntu PC
Adding a secondary hard drive to your Ubuntu PC can provide additional storage space, improve performance, and enhance overall system functionality. In this article, we will guide you through the process of installing and configuring a secondary hard drive on your Ubuntu system.
Preparation
Before starting the installation process, ensure you have:
- A compatible secondary hard drive (SATA, IDE, or SSD)
- A free SATA or IDE port on your motherboard
- A screwdriver and mounting screws (if necessary)
- Ubuntu installed on your primary hard drive
Step 1: Physically Install the Secondary Hard Drive
- Shut down your Ubuntu PC and unplug the power cord.
- Locate a free SATA or IDE port on your motherboard and connect the secondary hard drive.
- Secure the hard drive with mounting screws (if necessary).
- Reconnect the power cord and boot your Ubuntu PC.
Step 2: Identify the Secondary Hard Drive
- Open a terminal window on your Ubuntu PC.
- Use the lsblk command to list all connected hard drives:
BashNote the device name of the secondary hard drive (e.g., /dev/sdb).
lsblk
Step 3: Partition the Secondary Hard Drive
- Use the fdisk command to create a new partition table on the secondary hard drive:
Bash sudo fdisk /dev/sdbFollow the prompts to create a new partition table and partition the drive as desired (e.g., one large partition or multiple smaller partitions).
Step 4: Format the Secondary Hard Drive
- Use the mkfs command to format the secondary hard drive with a file system (e.g., ext4):
BashReplace /dev/sdb1 with the device name and partition number of your secondary hard drive.
sudo mkfs.ext4 /dev/sdb1
Step 5: Mount the Secondary Hard Drive
- Create a mount point for the secondary hard drive:
Bash
sudo mkdir /mnt-secondary - Mount the secondary hard drive to the mount point:
Bash
sudo mount /dev/sdb1 /mnt-secondary
Step 6: Configure the Secondary Hard Drive
- Add an entry to the /etc/fstab file to automatically mount the secondary hard drive on boot:
Bash sudo nano /etc/fstab
- Add the following line at the end of the file:
UUID=Replace
/mnt-secondary ext4 defaults 0 0 with the UUID of the secondary hard drive (found using the blkid command).
You have successfully added a secondary hard drive to your Ubuntu PC! You can now use the additional storage space to store files, install applications, or enhance system performance.
Troubleshooting
- If the secondary hard drive is not recognized, ensure it is properly connected and powered.
- If the secondary hard drive is not mounting automatically, check the /etc/fstab entry for errors.
By following these steps, you have expanded your Ubuntu system's storage capacity and improved its overall functionality.
Installing CUDA Toolkit and cuDNN Libraries on Ubuntu
The CUDA Toolkit and cuDNN libraries are essential tools for harnessing the power of NVIDIA GPUs for parallel computing, deep learning, and other computationally intensive tasks. In this article, we will guide you through the process of installing CUDA Toolkit and cuDNN libraries on your Ubuntu system.
Preparation
Before starting the installation process, ensure you have:
- An NVIDIA GPU with CUDA support (check the [NVIDIA website]((link unavailable)) for compatibility)
- Ubuntu 20.04 or later installed on your system
- A compatible Linux kernel version (check the [CUDA Toolkit documentation]((link unavailable)) for supported kernel versions)
- A user account with sudo privileges
- Add the CUDA repository to your Ubuntu system:
Bash
sudo apt-key adv --fetch-keys (link unavailable)
sudo add-apt-repository "deb (link unavailable) /" - Update your package list:
Bash
sudo apt update - Install the CUDA Toolkit:
BashReplace 11-6 with the desired CUDA version (check the [NVIDIA website]((link unavailable)) for available versions).
sudo apt install cuda-toolkit-11-6
Step 2: Install the cuDNN Library
- Download the cuDNN library from the [NVIDIA website]((link unavailable)).
- Extract the downloaded archive:
Bash
tar -xvf cudnn-linux-x86_64-8.3.2.44.tgz
Replace 8.3.2.44 with the version you downloaded. - 3. Install the cuDNN library:
Bash
sudo cp -r cuda/include/* /usr/local/cuda/include/
sudo cp -r cuda/lib64/* /usr/local/cuda/lib64/
Step 3: Configure the CUDA Environment
- Add the CUDA binaries to your system's PATH:
BashAdd the following line at the end of the file:
sudo nano /etc/environmentPATH="/usr/local/cuda/bin:$PATH" - Update your system's ldconfig:
Bash
sudo ldconfig
Step 4: Verify the Installation
- Verify the CUDA installation:
BashThis should display the CUDA version installed.
nvcc --version - Verify the cuDNN installation:
BashThis should display the cuDNN version installed.
sudo cat /usr/local/cuda/include/cudnn.h | grep CUDNN_MAJOR
You have successfully installed the CUDA Toolkit and cuDNN libraries on your Ubuntu system! You can now harness the power of NVIDIA GPUs for parallel computing, deep learning, and other computationally intensive tasks.
Troubleshooting
- If you encounter issues during installation, ensure your GPU is compatible with the CUDA version you are installing.
- If you encounter issues with cuDNN, ensure you have installed the correct version for your CUDA installation.
By following these steps, you have unlocked the potential of your NVIDIA GPU for computationally intensive tasks on your Ubuntu system.
Changing Your User Password in Ubuntu
Changing Your User Password in Ubuntu: A Step-by-Step Guide
Changing your user password in Ubuntu is a crucial security measure to protect your system and data from unauthorized access. In this article, we will guide you through the process of changing your user password in Ubuntu using the command line and the graphical user interface (GUI).
Method 1: Changing Your User Password using the Command Line
- Open a terminal window on your Ubuntu system.
- Use the passwd command to change your user password:
Bash
passwd - Enter your current password to authenticate.
- Enter your new password and confirm it by re-entering it.
- Your password will be updated.
Method 2: Changing Your User Password using the GUI
- Click on the gear icon in the top right corner of the screen and select "Settings."
- Click on "Users" in the Settings window.
- Select your user account from the list.
- Click on the "Password" field and enter your current password to authenticate.
- Enter your new password and confirm it by re-entering it.
- Click "Change" to update your password.
Additional Security Measures
- Use a strong and unique password for your user account.
- Enable two-factor authentication (2FA) for added security.
- Regularly update your password to maintain security.
Troubleshooting
- If you forget your password, you can reset it using the passwd command with the --reset option:
BashReplace
sudo passwd --resetwith your actual username.
By following these steps, you have successfully changed your user password in Ubuntu, ensuring the security and integrity of your system and data.
Playing Audio over HDMI or DisplayPort in Ubuntu
Ubuntu makes it easy to play audio over HDMI or DisplayPort, allowing you to enjoy high-quality sound on your TV, monitor, or soundbar. In this article, we will guide you through the process of configuring your Ubuntu system to play audio over HDMI or DisplayPort.
-
Step 1: Check Your Hardware
- Ensure your computer has an HDMI or DisplayPort output.
- Verify that your TV, monitor, or soundbar has an HDMI or DisplayPort input and supports audio playback.
- Open a terminal window on your Ubuntu system.
- Use the aplay command to list all available audio devices:
aplay -lNote the device number and name of your HDMI or DisplayPort audio device (e.g., "HDMI 0" or "DisplayPort 1").
- Open the "Settings" application on your Ubuntu system.
- Click on "Sound" in the Settings window.
- Select the "Output" tab.
- Choose your HDMI or DisplayPort audio device from the "Output device" dropdown menu.
- Ensure the "Output profile" is set to the correct format (e.g., "Stereo" or "5.1 Surround Sound").
- Play an audio file or stream music using your preferred media player.
- Verify that audio is playing through your TV, monitor, or soundbar.
Step 2: Identify Your Audio Device
Step 3: Configure Your Audio Settings
Step 4: Test Your Audio
Troubleshooting
- If audio is not playing, ensure your HDMI or DisplayPort cable is securely connected to both devices.
- If audio is still not playing, try setting the audio output to a different device or profile.
- If you experience audio lag or syncing issues, try adjusting the audio settings in your media player or using a different media player.
Additional Tips
- To switch between audio devices quickly, use the pavucontrol command:
pavucontrol
- To configure audio settings for a specific application, use the "Applications" tab in the Sound Settings window.
Installing and Using VPNs in Ubuntu
Virtual Private Networks (VPNs) are essential for maintaining online privacy and security, especially when using public Wi-Fi networks. Ubuntu makes it easy to install and use VPNs, and in this article, we will guide you through the process of installing and using VPNs in Ubuntu.
Step 1: Choose a VPN Provider
- Research and select a reputable VPN provider that offers a Linux client or OpenVPN configuration files (e.g., ExpressVPN, NordVPN, or ProtonVPN).
- Sign up for a VPN account and download the Linux client or OpenVPN configuration files.
Step 2: Install the VPN Client
- Open a terminal window on your Ubuntu system.
- Install the VPN client using the following command (replace "vpn-client" with the actual client name):
Bash
sudo apt install vpn-client - Follow the installation prompts to complete the installation.
Step 3: Configure the VPN Client
- Launch the VPN client from the Dash or menu.
- Enter your VPN account credentials and server information (provided by your VPN provider).
- Configure any additional settings as desired (e.g., protocol, port, or encryption).
Step 4: Connect to the VPN
- Click the "Connect" button to establish a VPN connection.
- Verify your VPN connection by checking your IP address or using a tool like wget -q -O - (link unavailable) in the terminal.
Step 5: Use OpenVPN (Alternative Method)
- Install OpenVPN using the following command:
Bash
sudo apt install openvpn - Download the OpenVPN configuration files from your VPN provider.
- Place the configuration files in the /etc/openvpn directory.
- Start the OpenVPN service using the following command:
sudo service openvpn start
- Verify your VPN connection as described in Step 4.
Troubleshooting
- If you encounter issues connecting to the VPN, ensure your account credentials and server information are correct.
- If you experience connectivity issues, try switching to a different VPN server or protocol.
Additional Tips
- To automatically start the VPN client on boot, use the following command:
Bash
sudo systemctl enable vpn-client - • To check your VPN connection status, use the vpn-client command or service openvpn status for OpenVPN.
By following these steps, you have successfully installed and configured a VPN in Ubuntu, ensuring your online privacy and security.
Managing and Adding User Accounts in Ubuntu
Ubuntu makes it easy to manage and add user accounts, allowing you to control access to your system and files. In this article, we will guide you through the process of managing and adding user accounts in Ubuntu.
Step 1: Accessing the User Accounts Settings
- Open the "Settings" application on your Ubuntu system.
- Click on "Users" in the Settings window.
Step 2: Creating a New User Account
- Click the "Add User" button.
- Enter the new user's name and username.
- Choose a password and confirm it.
- Select the account type (Standard or Administrator).
- Click "Add" to create the new user account.
Step 3: Editing an Existing User Account
- Select the user account you want to edit.
- Click the "Edit" button.
- Make the desired changes (e.g., changing the username, password, or account type).
- Click "Save" to apply the changes.
Step 4: Deleting a User Account
- Select the user account you want to delete.
- Click the "Delete" button.
- Confirm the deletion by clicking "Delete" in the pop-up window.
Step 5: Use OpenVPN (Alternative Method)
- Click on the "Settings" icon next to each user account.
- Configure settings such as:
- Language and Region
- Keyboard Layout
- Accessibility options
- Click "Save" to apply the changes.
Additional Tips
- To add a user to a group, use the usermod command:
Bash
sudo usermod -aG - To reset a user's password, use the passwd command:
Bash
sudo passwd - To view a list of all user accounts, use the getent command:
getent passwd
By following these steps, you have successfully managed and added user accounts in Ubuntu, ensuring control over access to your system and files.