Chassis & Accessories Support
Velocity Micro's award winning Customer Care, the premier source for information on your Velocity Micro PC. To help answer your questions and address support issues, our team of experts have compiled this library of walk-throughs, downloads, and FAQs. This information is updated, expanded, and refined on a daily basis to ensure you have the very latest information available.
Skip to
How to set up multiple displays
Using multiple displays can dramatically increase your productivity or give you a more immersive gaming experience. Most video cards can support at least 3 separate displays, while high end cards can do as many as 4.
Before connecting your monitors to your video card, make sure your system is off first. Connect each monitor to the appropriate video out port (for assistance, see our How to Connect Your Monitor tutorial). Boot the system. NOTE: The Velocity Micro logo may only show on one screen - that is normal. The Windows login screen may also do the same.
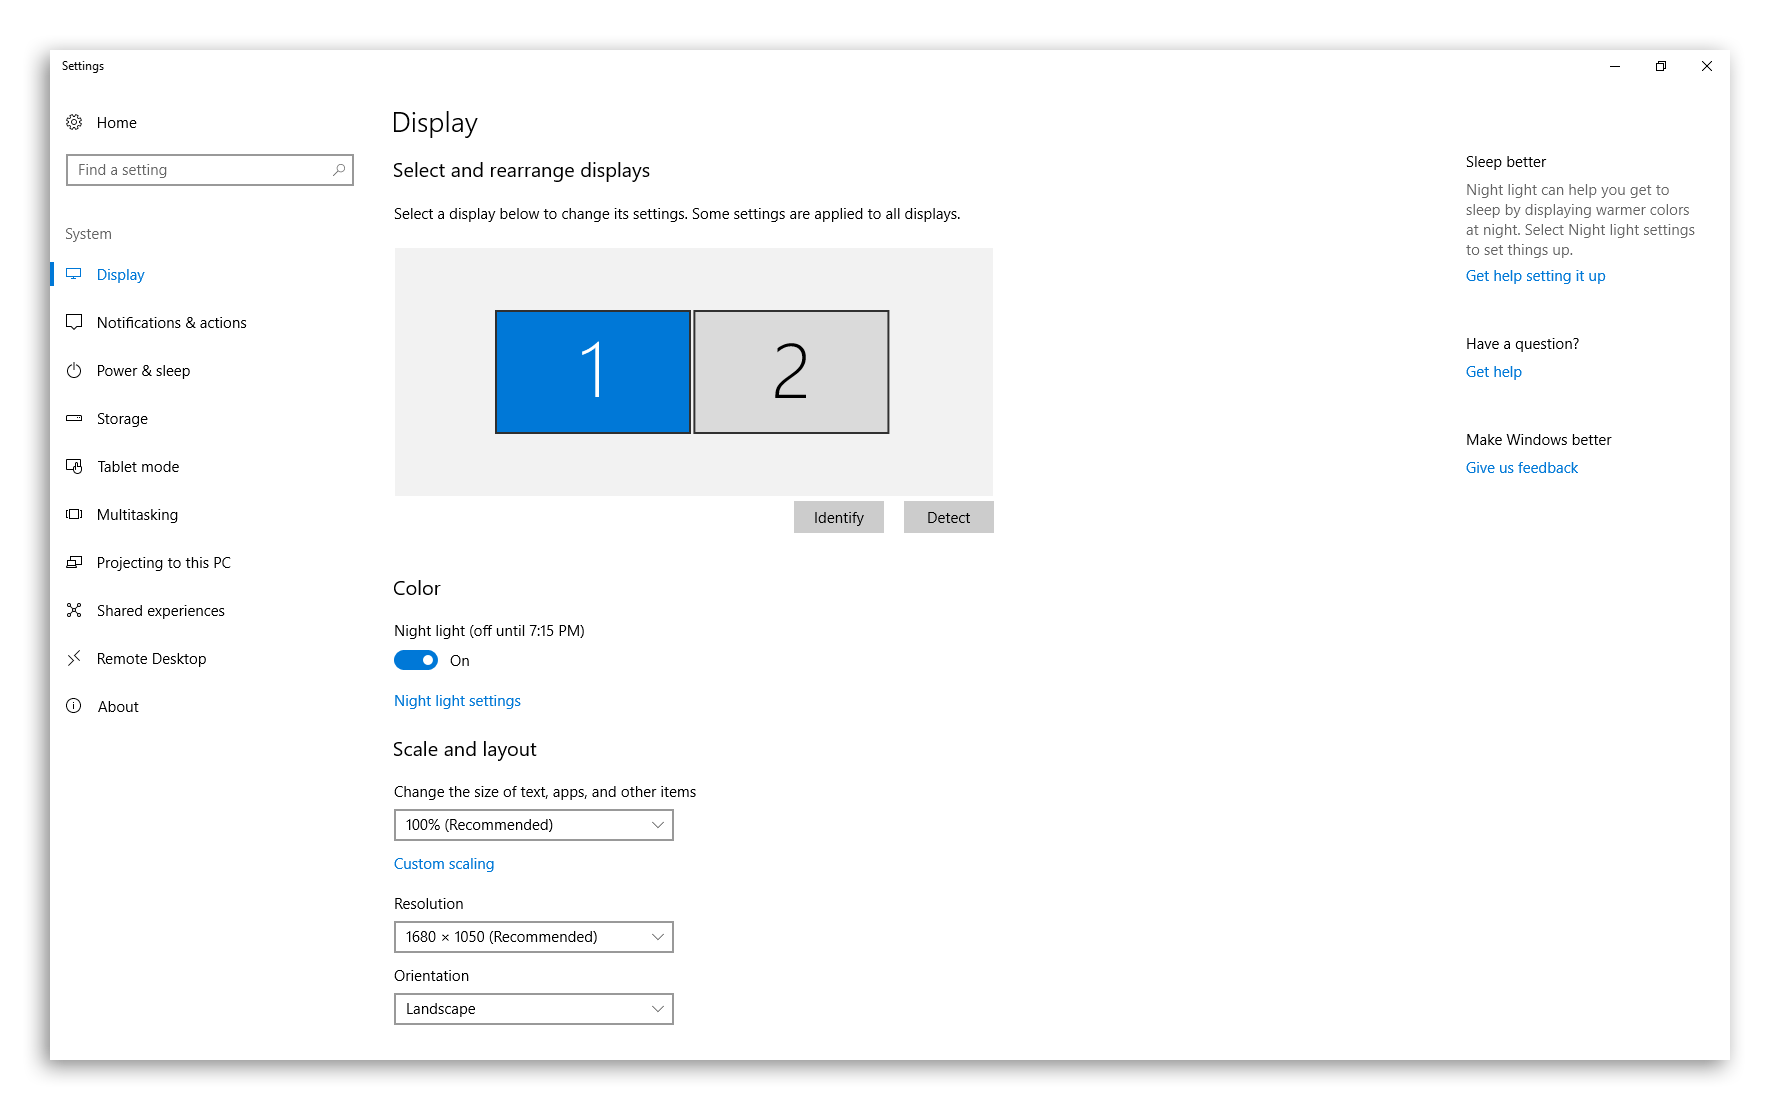
Once in Windows, you will need to adjust the placement of your monitors through the Windows Display Settings. To do this:
- Either right click anywhere on the desktop and select "Display Settings" from the context menu, or left click on the Windows Start Menu in the bottom left of the screen and type "Display Settings" and press enter.
- A window should pop up with a graphical representation of your connected monitors. If you have 3 monitors connected, there will be 3 monitors shown in the box. You may notice that the arrangement of the monitors may not be the same their arrangement on your desk, i.e. Windows may think that monitor 1 is on the right when it is actually on the left. Since physically moving your monitors may not be feasible, Windows allows you to drag and drop the boxes to match your setup. If you're not sure which monitor is which, the button labeled "Identify" will show a large number to appear in the lower left corner of each screen.
- Once you've moved all the monitors to their correct positions, click "Apply" to save your changes. To make sure that everything is right, move your mouse from one monitor to the next. Assuming everything worked out, you should be good to go.
How to connect your monitors to your PC
Depending on your video card or motherboard, there are numerous ways to connect your system to your monitor or monitors. There are 4 main types of connections - HDMI, DVI, DisplayPort, and Mini DisplayPort.
DVI can come in 2 flavors: DVI-I and DVI-D. DVI-D is more common, while DVI-I is able to work with DVI to VGA adapters NOTE: As of the Nvidia 10 series cards, DVI-I connectors are no longer used or supported, so DVI to VGA adapters will not work.

HDMI is the most common connection type. HDMI is able to do video as well as sound, and HDMI 2.0 can do 4K video at 60Hz. Newer cards, such as the Nvidia 30 series and AMD Radeon 6000 series, are HDMI 2.0 compliant. If you are unsure if your card has HDMI 2.0, check the manufacturer's website.

DisplayPort is a newer connection type that looks similar to HDMI, except with one side squared off. Unlike HDMI, DisplayPort connectors have a locking mechanism to keep the connection in place. You will need to press down on the latch to pull the connector out. DisplayPort is ideal for driving high resolution, high refresh rate monitors such as a 4K monitor at 144Hz. The newest version is DisplayPort 1.4, which can push up to 8K resolution and has the widest range of color accuracy as well as the highest quality audio. If you are doing some high end gaming or advanced video and photo editing, DisplayPort is the best choice.

Mini DisplayPort is functionally identical to full size DisplayPort, just with a smaller, more square connector.

For connecting multiple monitors, you'll need to plug all video connections into your video card directly - not your motherboard video outputs. If the issue is not having enough connections for HDMI, DisplayPort, etc., then we recommend either buying adapters or upgrading to a better video card. If you need help setting up multiple monitors, see our guide on how to do that.
Once you've determined the type of connection you need for your setup, it's time to start making those connections. First, make sure the system is powered off before connecting any cables. Then, connect your system to your monitor via the appropriate cable and power it on. Older monitors may not auto detect the right input source so you may need to press a button to manually switch inputs. Once the system powers up, you should see the Velocity Micro logo on your screen. If you need to adjust resolution and scaling, you can do so in the Windows Settings.
How to connect speakers to your PC
There are multiple audio configurations possible for connecting speakers to your computer audio. Refer to your speaker's documentation and your motherboard or sound card manual for additional assistance.
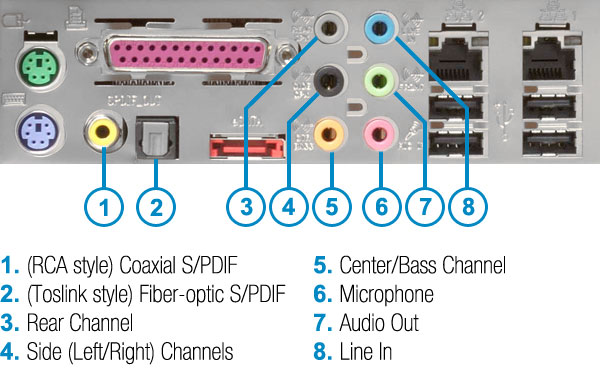
Below is an example of onboard audio ports.
Most computers today have onboard audio, with at least the 3 standard analog audio ports: (6, 7, 8)
They may also include additional analog ports for multi-channel connections...: (3, 4, 5)
...and digital ports for digital audio out to your sound system: (1, 2)
Connecting speakers to a sound card
Users who configure their systems with PCIe sound cards added in and disable the onboard sound may have a different assortment of ports. The Creative Audigy card in the image below shows (from left to right):

1394 port
Center/Bass Channel
Side (Left/Right) Channels
Audio Out
Microphone
Line In
(RCA style) Coaxial S/PDIF
The audio card in the image below has a different configuration yet again (from left to right):

FlexiJack — Combination Microphone/Line In or S/PDIF digital out
Audio Out — (Line 1 Out)
Rear Channel — (Line 2 Out)
Center/Rear Center/Subwoofer Channel — (Line 3 Out)
Connections
Microphone: Pink microphone cable to the Pink port
Audio Line In: Line In cable to the Blue port
2-Speaker or 2.1 Channel Configuration: Green speaker cable to the Green port
4.1 Channel Configuration: Green speaker cable to the Green port, black speaker cable to the Black or Grey port
5.1, 6.1, 7.1 Channel Configuration: Green speaker cable to the Green port, black speaker cable to the Black port, orange speaker cable to the Orange port
Please Note: Additional purchase of cables and/or adapters may be required for interoperability with your sound equipment.

Cable Type 1
The connector type used for analog connections, the standard 3.5mm male stereo jack commonly used for stereo headphones or 2-channel speakers.
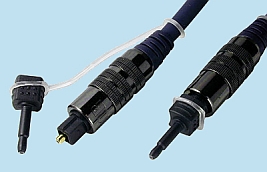
Cable Type 2
The connector type used for digital connections via fiber-optic S/PDIF. The image shown is of a standard Toslink cable with an optional mini Toslink adapter.
How to connect peripherals to your PC
There are a wide range of peripherals and accessories you can connect to your PC, and many different ways to connect them. The most common connection types may include USB, HDMI, DVI, DisplayPort, Mini DisplayPort, Ethernet (also called RJ45), S/PDIF (also called TOSLINK or Optical Audio), various 3.5mm audio jacks (speaker out, mic in, centerline subwoofer, channel left, channel right), and a combo PS/2 port. Some more specialized connections for server and workstation boards may include serial ports (also called DB9), and IPMI (looks identical to Ethernet but has a different function). If you are unsure what a connector may be, check the motherboard's manual.
Most accessories you connect will probably be via USB. Depending on your motherboard, there may be several different colored USB ports, which may be confusing at first. Here's a quick rundown of the different types of USB ports and how you should use them.
USB 2.0 ports are almost always black, and have been standard on PC's for more than a decade. Most motherboards come with at least 2 USB 2.0 ports, but there are some that do not come with any. It is generally a good idea to reserve these for your mouse and keyboard and leaving the other high speed USB ports for other things. Keyboards and mice do not really benefit from the higher speed, although some gaming keyboards may require 2 USB ports for increased power, so if you have one, bear that in mind.
USB 3.0 (aka 3.2 Gen 1) ports are almost always dark blue. USB 3.0 offers high speed data transfer (up to 5 Gbps) and provides more power to peripherals, and is generally backwards compatible with USB 2.0 accessories. Note: if an older peripheral is having issues, plugging it into a USB 2.0 port may resolve them.
USB 3.1 (aka USB 3.0 Gen 2) is where things start to get a little confusing. A standard USB 3.1 port is the same shape as a USB 2.0 and 3.0 port (this type of connection is called Type A) but is usually a teal color. Most boards only have 1 or 2 of these. USB 3.1 offers double the transfer speed of USB 3.0 (up to 10 Gbps) and can transfer even more power to peripherals. Again, it should be backwards compatible with older USB devices, but that is not guaranteed.
USB Type C - unlike the above mentioned USB types, USB C is simply a specific connection form factor, not a transfer speed. These Type C ports are oval, reversable inputs commonly found on modern smartphones. Type C can be USB 3.2 Gen 1, Gen 2, or Gen 2x2 and can even be Thunderbolt compatible. For more info check your motherboard user manual.
Depending on your configuration, your system will have a variety of video ports to choose from. If your system has a dedicated video card, make sure that you use those connections for your monitors rather than those on the board. If you need help setting up your monitors, please check our guide on how to do that.

Why am I only getting sound from 2 of my 5.1 speakers?
When connecting 5.1 channel speakers to your system, it can be tricky getting them configured properly.
Before continuing, check to see that your connections are correct. Do all your satellite speakers plug into your Subwoofer/Bass speaker with a single analog plug into the green audio out? Or are you using multiple analog cables? See this article for additional assistance on connecting audio devices to your PC.
On some systems with Realtek onboard audio where there are only 3 analog audio ports on the rear of the PC, a number of settings must be checked on the system to get audio from all ports.
To address this:
- Open Realtek HD Audio Manager
- Verify that Speaker Configuration is set to 5.1
- Under Optional Speakers – uncheck all
How do I change the resolution and refresh rate on my monitor?
First, check your monitor's manual to find the desired resolution / refresh rate combination. Using unsupported settings can damage your computer.
Resolution:
Right-click on any empty area on your desktop. Select "Properties". Select the "Settings" tab. In the lower left-hand corner you will see an area labeled "Screen resolution" - drag the slider across until you reach your desired resolution.
Refresh Rate:
Follow the above steps until you get to the "Settings" tab. Select the "Advanced" button in the lower right-hand corner. Select the "Monitor" tab. Select your desired refresh rate in the drop-down box.
Where can I find the rubber grommets and screws for mounting hard drives in legacy GX or MX cases?
Customers wishing to add additional hard drives will need to purchase additional screws and grommets. Contact our support team to open a support ticket for assistance.
How do I control the RGB lights in my system?
RGB lighting is all the rage right now, with everything from cases and keyboards to fans and even RAM sticks having RGB lights. While looking very cool, they don’t offer any performance benefit at all, but you can still have a lot of fun tweaking the lighting to look exactly the way you want. There are a few things to go over before getting into how to control your RGB lights, though.
First, even though RGB is pretty common and widespread these days, there is no standard for how RGB should work, so each manufacturer has their own implementation of RGB that is usually incompatible with other manufacturers. For example, Asus uses their own implementation of RGB called Aura, which won’t work with RGB accessories made by Corsair such as an RGB keyboard, as Corsair uses their own RGB control program called Corsair Link. Manufactures can’t even agree on the number and arrangement of pins for RGB connectors, with most having four but sometimes, and some even use GRB instead of RGB. The reason all of this is worth mentioning is that if you have RGB accessories from several different manufacturers you will need the control programs for each of them. Not only is this a pain to set up but if they are all set to run on Windows startup they can slow down your boot times. Whenever possible, try to use RGB accessories from the same manufacturer, not just for the reasons we just mentioned but also because you can do some really cool synchronized effects if you have matching devices.
Second, as stated earlier, RGB lighting has absolutely no effect on system performance. While it is generally true that RGB fans are better in terms of cooling than non-RGB fans, the lighting itself does not give any measurable performance gain. Some RGB control programs do allow you to have the color of the RGB reflect system temperature, such as blue for cool and red for hot.
So, let’s get into what you’ll need to control your RGB lighting. If your system has an Asus motherboard with RGB lighting, then it will have Asus Aura preinstalled. In Aura you can tweak individual areas of the board as well as the speed of the RGB transition or set everything to a single color if you like. Play around with it and see what you like. If you bought a Corsair mouse or keyboard with your Velocity Micro computer, then you need the Corsair Utility Engine (CUE) to control the lights on those. CUE is a more comprehensive program than Asus Aura, not only allowing you to adjust the lighting but also update the firmware and change the key bindings of your Corsair devices. Devices from other manufacturers will need their own utilities to adjust their lighting, such as Logitech or Crucial. Some accessories will list on the box if they are compatible a certain manufacturers RGB program, such as Asus Aura. When in doubt, either check the manual or contact the manufacturer for more info.